XC Racer Blog Post
Beginners Guide To Trailside Bodging – Drivetrain
Share on Facebook Share on TwitterBY: Andrew Howett
Published: 22nd February, 2014

We’ve all been there. Everything is going well, you’ve got the line through every corner spot on, every gear change, every braking point, passing people up all the climbs, enjoying every descent. Then your rear mech explodes amid a shower of expensive carbon fibre and chain links which have turned into a wide variety of interesting shapes. Now what do you do? Near the end of a lap running back to the pits for the spare bike is obviously an option. Halfway through Keilder or the Manx 100 the idea looks less attractive and it is pretty much a non-starter when you are in the middle of nowhere and 100 miles from civilisation. You are going to have to fix it.

When I’m racing I carry a multitool, which has the usual selection of hex keys along with a chain tool and a couple of Torx bits. I also have a spare chain connector and, rather less usefully for drivetrain issues, a tube and a gas canister held onto my stem with the handy Mt Zoom strap thingy. I always wrap some tape around my canisters as they get very, very cold during discharge. It is also a handy place to keep some tape. My chain tool is probably the piece of kit I lend to people most often, and not just in races, I am amazed how many people will go out riding without one. Everything below can be done with this little selection.

We’ll start with the very basics. I have seen people new to biking who have had something as simple as a chain come off and not known how to put it back, pulling at the chain in vain. The rear mech does two jobs, it moves the chain from one sprocket to another but also provides tension in the chain, and this tension must be released to allow you put the chain back onto one of the rings. Use your shifter to put the front mech into the best position, the smallest ring if your chain has come off that side, and to the big ring if it’s gone that way.

Front mech moved to little-ring position
Then push the rear mech forward to release the tension (if you have a mech with a clutch put the lever in to the off position to do this) and replace the chain. It's the pushing forward bit which appears not be obvious to newbies. Give the cranks a couple of turns by hand to make sure it’s sorted.
Push the mech cage forward to release the tension in the chain
For removing foreign objects from a mech it is often quicker simply to remove the jockey wheels than to spend ages pull at it and trying to get little strands out. Just removing the lower one is usually sufficient to get the chain out but if it is clogged as badly as the one below you may need to do both. 
One particularly unpleasant one I had was after I had run over a dead rabbit, I ended up with a cassette full of tendons, which are surprisingly strong and stretch forever rather then break when you pull them. Cleaning that lot out was not a lot of fun.
There are two ways a chain can break. Occasionally you will get a nice clean break, with both ends still nice and tidy and you can just put a new connector straight in. However, a clean break like this usually only happens at a join, where a connecting link has come apart for example (this should be obvious as if this is the case there will be no connector remaining elsewhere on the chain.)

Whilst this is nice and convenient and means that a repair will only take a few seconds it does indicate that you probably didn’t connect it properly last time, don’t make the same mistake again! There is a definite feel of things clicking into place when you get it right, so you should know when it is done correctly. Give it a good tug and a twist just to make sure.
To take it apart again, squeeze the two parts of the connector together, in the 'across the chain' direction and then push them together in the 'along the chain' direction.
A less clean break will require the damaged links to be removed before it can be repaired. A chain tool basically consists of a couple of plates to hold the chain still and a peg which pushes the pin of the chain in or out when the handle is turned. To repair a messy break such as this you need to remove the damaged end(s).

To reconnect with a SRAM Powerlink place the links into the two ends of the chain, insert them into each other and then pull them apart until you feel the click. The Shimano pin requires the tool to insert, the pointy end goes in first as a guide, then the tool is used to push it all the way in until the back is flush with the chain.
You will see that halfway along the pin is the groove where
it is designed to snap.
|

When it is in the pointy end will be sticking out the other side, snap this off with the chain tool.

It snaps off really easily, just twist the chain and/or tool
If you don’t have a spare pin with you it is possible to reuse an old one, although it will create a weak spot in the chain. It will usually need to be one link back from the damage. Start to remove it as you would normally but stop when the end of it remains in the outer link, if you fully remove it it will be a real pain to get it back in again.

Note the absence of the pointy end you get on a nice new
pin, this blunt end is much harder to get in properly.
Also, pay particular attention to keeping it straight. Remove the damaged section and line up the clean end ready to put the pin back in. It will go through the centre section easily but watch the other outer plate, unless you have it lined up absolutely spot on it will attempt to push the plate outwards, bending it in the process. Press the plate against the tool to stop this happening. If it goes a bit awry don't be afraid to turn it around, push the pin back and start again. When you do get it seated it will probably be a little stiff, you may need to use the tool to push it back and forth slightly until it moves freely.Probably the next most common problem is a snapped gear cable. Prevention is easy, before a big race put a new one in, it only takes a couple of minutes and is quite simple to do. In a long single-lap or point to point race such as the Manx 100 or Transvesubienne I will carry a spare cable and a mech hanger, but few people carry one in short XC races. If you have a problem with the cable the mech will default to the smallest sprocket or smallest chainring, neither of which are ideal. Shimano’s ‘Rapid Rise’ rear mechs have the spring in back to front and they naturally default to the largest sprocket. These are much less common but the fix is the same:
First, remove the gear cable, or at least tie the end off or tape it to the frame (a use for the tape wrapped around your gas canister) this is to stop it catching in the wheel or drivetrain. You won’t be able change gear so select one you will be happy in for the rest of the race, usually the smaller end of middle (you can always change it if you make the wrong choice or for example if you tire as the race goes on and want a smaller gear) Use the limit screw to move the mech up the block to the suitable gear.

On a conventional mech turn the top limit screw clockwise. On a rapid-rise mech it will be the bottom screw, but turned in the same direction, to move the chain down the block. Remember how many turns of the screw you make to make it easier to put it back to how it was when you put the new cable in.
A front mech will default to the smallest chainring. If you have a double this may not be too much of an issue if you have suitable ratios, but if you want the larger one, or the middle one of a triple you have two options. The limit screw can be used in the same way as for a rear mech but it is also possible to wedge it in the desired position using a small stick or stone. This can be quicker if a suitable size one is immediately to hand, but also means that the screws are already in exactly the right place when you replace the cable.

You can either place the object inside the mech body to move it or wedge it between the cage and the seat tube, the spring should be easily strong enough to hold it in place. You obviously need the chosen object to be large enough to move the mech to the desired position but just make sure it doesn't catch on your foot.


Trim it to the appropriate length using your chain tool and reconnect it as described above.

You may get lucky here. Singlespeeders have something they refer to as the ‘magic ratio’. Very occasionally everything will just fall in to place, your chainring size, your sprocket sixe, your chainstay length, even the amount of stretch on the chain, and a whole number of links will fit perfectly, giving you exactly the right length chain. The right length by the way is that when it is all connected up you should be able to depress the centre of the lower part by about half an inch. Anyway, because magic ratios are pretty uncommon Singlespeeders have come up with a variety of ways of making the bikes work, chain tensioners, sliding dropouts, eccentric bottom brackets, half-links, etc, etc. You are unlikely to be carrying any of these items as a spare during a race so you are probably going to have to put up with a chain which is very slightly too long. Be careful with your pedalling, as a slack chain is more likely to come off. Try not to freewheel, use your pedalling action to keep a bit of pressure on the chain at all times.
If you have a full suspension bike you will encounter another problem; compression of the rear suspension. On bikes where the chain shortens as the suspension compresses (most single-pivot designs for example) the chain will slacken dramatically as the chain compresses. Worse is ones where the chain lengthens as the suspension compresses, at best the shorter chain will prevent the suspension compressing, at worst it will cause all sorts of other damage. Even the sag due to the rider's weight can cause issues. If you have a lock out use it!
Not all mech problems will be fixable by the side of the track, indeed some are going to require new components. In situations like this you are going to have to go for the singlespeed option above.

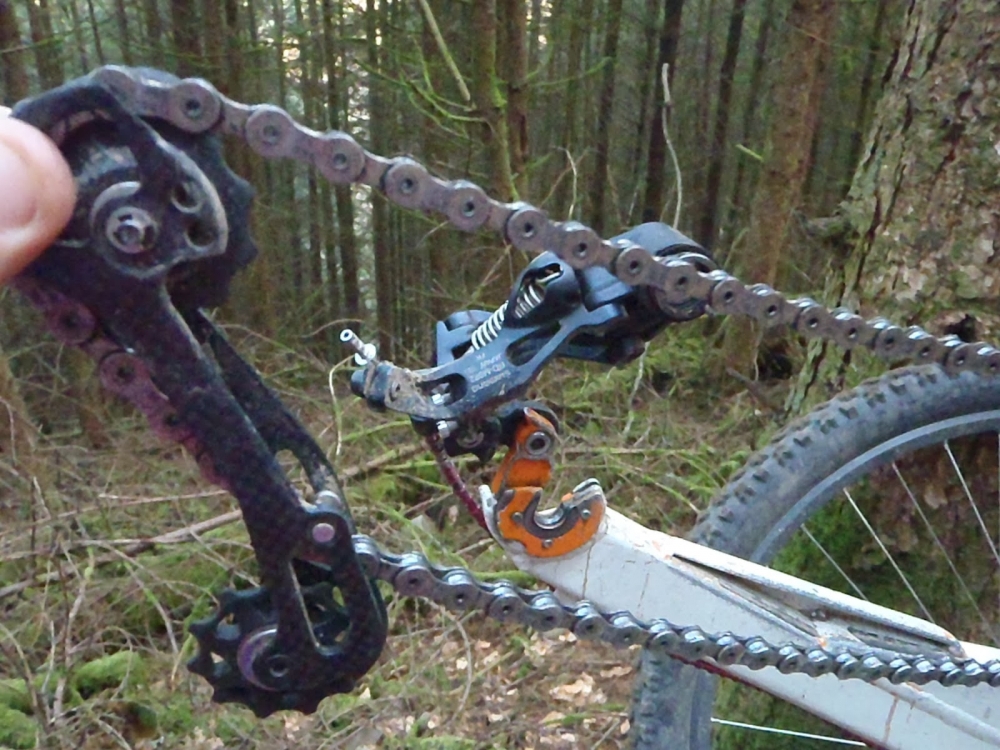
However, some problems are not as terminal as they first look. There is a problem I have only had once, and which took a while to figure out the solution to, but once you know how to do it it is surprisingly simple, in theory anyway, it can be a three-handed job to mend. The main tension spring in my rear mech somehow popped out and I was left with the mech cage flopping about uselessly below the mech. I have recreated it here in the warmth and comfort of my garage. The one in the example is a Shimano XTR M972 Shadow, but most will be fairly similar.

You can see the problems a lack of spring tension causes.
The first thing to do is to remove the chain, if you don’t have a Powerlink the easiest way is to remove the lower jockey wheel. Actually this will have to come off anyway so you may as well do it this way even if you do have one. Then remove the cable from the mech and the mech from the hanger. Unscrew the bolts which hold the jockey wheels to the cage and take them off. 
The jockey wheels here are obviously not the original XTR ones,
indestructible and only 5.6 grams each.

This is the bolt which holds the cage to the main body of the mech, when you unscrew this the cage will come off and you will be able to see the spring inside. Pull this out.

There will be a largish washer-type thingy inside it (sorry to go all technical). As you can see the spring has a narrow end and a wide end, as does the largish washer-type thing. Place the largish washer-type thingy into the spring, narrow end to narrow end.

On the main plate of the cage is a peg which stops it rotating all the way round, unscrew this.

Inside the main body of the mech from where the spring came is a very small hole. Put the spring in narrow end first with the peg on the end of it in the very small hole, this will leave the peg on the other end of the spring protruding.

On the main cage plate are two small holes, the peg on the top of the spring will fit in either.

Looking at it from the cage side, away from the body, placing it in the one furthest round in an anticlockwise direction, to the right in the picture, will give the greatest tension in the rear mech, placing it in the other will make the following steps slightly less difficult.
Place the cage onto the body of the mech with the peg of the spring in the chosen hole.

Holding the body with one hand use the other hand to turn the cage as far as it will go in an anticlockwise direction, pushing down really hard to keep the spring compressed.
 Use your third hand to screw the bolt back through the main body and into the cage, this should be done up pretty tight. (those of you with fewer than three hands will either have to find something to wedge it with or ask a friend to help you)

This all sounds very simple but that spring will be flying everywhere many times, taking the cage, bolt, largish washer-type thingy and bits of finger with it, before you finally manage to get it to hold it together.


A big thank-you for the pictures, some of which I was loath to recreate in my garage for obvious reasons, goes to:
Euan C
Evil Joe
James
and Mackem
Holding the body with one hand use the other hand to turn the cage as far as it will go in an anticlockwise direction, pushing down really hard to keep the spring compressed.
This is very difficult to show without my hands getting in the way
This all sounds very simple but that spring will be flying everywhere many times, taking the cage, bolt, largish washer-type thingy and bits of finger with it, before you finally manage to get it to hold it together.
All back to normal
Replace the little peg back into the cage and then remove the stick and replace the jockey wheels and the other half of the cage. Then put the mech back onto the frame, the cable back into the mech and away you go.
Never underestimate the humble zip-tie. Somehow this
managed a lap of Dalby after the threads in the mech
hanger were stripped.
One last piece of advice I will give is practice before any of this happens in a race. You can take your time in the relative warmth and comfort of your shed and get the hang of things before you have to do it for real. If you have any old chains or mechs lurking in the spare box get them out and have a play. Chances are if you have spent time and effort to learn how to do something you will never have to do it for real, sod's law can be turned to your advantage!
A big thank-you for the pictures, some of which I was loath to recreate in my garage for obvious reasons, goes to:
Euan C
Evil Joe
James
and Mackem
Blogger Info:

Andrew Howett
Age: 33
Location: Scottish Borders. A big improvement, topographically if not meteologically, over my home of South Lincolnshire.
XCRacer/Scimitar team member
Racing since 1999, racing 24hrs since 2010
Disclaimer:
This blog post was written by a third party and their views do not necessarily reflect the views of XCRacer.com

Contact Us | Advertise | Use Our Online Entry System
All content © XC Racer.com | Website Designed and Developed by DesignUNLTD